Pre-requisites
IAMbic runs on Mac, Linux, or Windows Subsystem for Linux (WSL). Before getting started with IAMbic, make sure you have the following pre-requisites and permissions:
- Install git.
- Install Python 3.11+. Running IAMbic locally instead of Docker is the recommended way.
- Install the GitHub CLI and authenticate with GitHub (recommended)
- Set up administrative access in AWS to run the IAMbic Setup Wizard. (required)
- Set up administrative access to your GitHub organization or personal account. (required)
- Install Docker and verify it's installed. (optional)
Notes:
- IAMbic leverages CloudFormation to create resources across your AWS Organization and/or accounts. So administrative access to AWS is required to run the Setup Wizard.
- IAMbic uses GitHub to store and version control your IAM. Administrative access to your GitHub organization is required to run the Setup Wizard, as this will require the ability to create repositories and a GitHub Application.
Installing and Configuring IAMbic
Before starting, make sure you have the following information:
- AWS organization ID (if applicable) or AWS account ID(s)
- AWS IAM credentials with admin privileges
- Knowledge on AWS Hub and Spoke Roles
Configure AWS IAM credentials
First, create credentials with Administrator privileges on AWS. They can be at the Organization level, or in personal account (good for testing). These credentials and account information will be used to run the IAMbic Setup Wizard.
If required by your organization, you may refer to a list of specific permissions required to run the wizard to set up a scoped role.
Refer to the AWS documentation for specific guidance on configuring credentials.
Set up the GitHub Repositories
GitHub repositories are used to store IAMbic templates and change summaries for your cloud resources. IAMbic provides GitHub workflows that keep IAM identities and permissions updated within your repository.
Please follow these steps to set up the repositories:
- Set an environment variable containing your GitHub Organization name (or your GitHub username):
export ORG_NAME=<your_github_organization_name>
or
export ORG_NAME=<your_github_username>
- GitHub CLI
- GitHub Web UI
- Create the
iambic-templatesandiambic-templates-gistrepositories required by IAMbic:
gh repo create "${ORG_NAME}/iambic-templates" \
  --private --template noqdev/github-iambic-templates
gh repo create "${ORG_NAME}/iambic-templates-gist" \
  --private --template noqdev/github-iambic-templates-gist
- Create the
iambic-templatesandiambic-templates-gistrepositories required by IAMbic by visiting the following links.
Set these repositories to Private, and name them iambic-templates and iambic-templates-gist
respectively
- Clone the
iambic-templatesrepository and install IAMbic locally in a Python virtual environment.
gh repo clone ${ORG_NAME}/iambic-templates
Note: No need to clone iambic-templates-gist. It'll be used later.
- Install IAMbic in a Python virtual environment, for example:
cd iambic-templates
python3 -m venv venv
source venv/bin/activate
pip install iambic-core
Configuring IAMbic
To start the IAMbic Wizard, run the following command:
iambic setup
Alternatively, you can create the configuration manually.
Check out other commands with iambic --help.
Running the wizard produces config files locally, which will need to be committed and pushed to GitHub:
git status
git add .
git commit -m "Add imported resources"
git push
Running IAMbic in production
In a production deployment, IAMbic imports and applies should be run in a CI/CD pipeline, triggered by a GitHub webhook. IAMbic provides the following to make this easy:
- A GitHub Application that can be installed on your GitHub Organization (or personal account)
- A Docker container that will be deployed in AWS Lambda
- AWS EventBridge rules that will trigger the Lambda function to run IAMbic commands periodically.
Setup the GitHub Application
IAMbic uses a GitHub Application to manage the GitHub workflows that keep your IAM resources up to date. In order to install it, make sure again that you have:
- GitHub org admin permissions
- AWS administrator permissions with the ability to assume IambicHubRole in the management account
- AWS administrator permissions to deploy the IAMbic GitHub integration.
To configure the application, run:
iambic setup
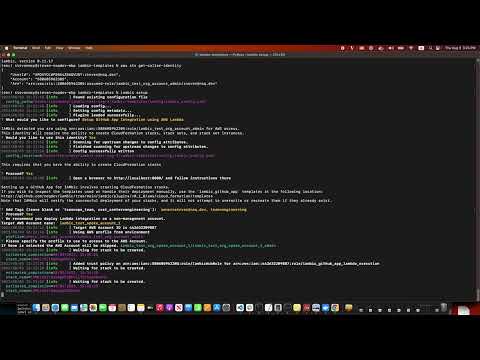
- Select
Setup GitHub App Integration using AWS Lambdaoption - Give the application access to your
iambic-templatesandiambic-templates-gistrepositories. Do not give it access to your other repositories.
Check out this video for a walkthrough:
Set the avatar of your GitHub App (Recommended)
Expand for instructions
Set up an avatar for your GitHub app to easily recognize its identity in pull requests.
We have provide both light and dark icons for you.
Download them to your local computer.
- From the previous section, click on "App Settings".

- Scroll down to "Display Information", click on "Upload a logo..."

- Choose either the light icon or dark icon from your computer
- Click on the "Set new avatar" button

Configure your GitHub Repository to require approvals before merging
Now that the app is installed, you need to protect your branch and put some merge guardrails in place:
- Go to the GitHub repository you had created previously,
ExampleOrg/iambic-templates - Navigate to Repository Settings, in the left navigation menu to "Branches" settings page; the URL will look something like
github.com/ExampleOrg/iambic-templates/settings/branches

- Add a branch protection rule.
- Set the branch name pattern to
main(Or the name of your default branch, if it isn'tmain). - Configure the options
- Enable "Require a pull request before merging".
- Enable "Require Approvals".
- Leave the default value for "Required number of approvals".
- Enable "Require status checks to pass before merging".
- Click "Save changes" to save the branch protection rule.
Enable iambic-integrations to bypass review rules for default branch
In the typical review flow for pull requests, approval from reviewers is necessary. However, certain actions like auto import or auto expiration involve pushing changes back to the default branch without requiring manual approvals.
- Go to your iambic templates repository settings (https://github.com/ExampleOrg/ExampleIambicTemplatesRepository/settings).
- Click "Branches" in the top left navigation.
- Click on "Edit" for your default branch (typically "main" or "master") under "Branch protection rules".
- Click on "Allow specified actors to bypass required pull requests".
- In "Search for people, teams or apps", type in
iambic-integrationsto click on the GitHub App we have created. - Click "Save changes".
Open a pull request on your iambic-templates repository
Once you have configured the GitHub Application, and have configured your branch setting, you can start making changes to your config by creating PRs:
default_branch=$(git symbolic-ref refs/remotes/origin/HEAD | sed 's@^refs/remotes/origin/@@')git checkout -b task/change_description "$default_branch"- Edit one of your description within your templates, like
resources/github/iam_role_lambda.yaml. See here for an example template if needed. - Add your changes to your branch, and push it to github:
git add resources/github/iam_role_lambda.yaml
git commit -m "Change Description"
git push origin HEAD - Create a pull request.
- The installed GitHub App will comment with a plan for the changes. If you would like IAMbic to re-plan the changes, you can comment
iambic plan. - The plan will be provided as an inline comment if it is less than 65kb. Larger plans are uploaded to the
iambic-templates-gistrepository and linked as a comment in the PR - Add reviewers to review your PR and IAMbic's plan in the PR comments.
- Once your reviewer approves your changes, add
iambic applyas a comment to instruct IAMbic to apply the changes. After the Cloud changes are successfully applied, IAMbic will merge the PR into your default branch (Typically main or master).
Next Steps
Now that you have IAMbic installed and configured, you're ready to move on to the next steps. Depending on your goals, you may configure IAMbic to work with AWS and supported identity providers.